As sustainability becomes an increasingly important consideration for boaters, sailboat owners are turning to solar power as a reliable and eco-friendly solution to meet their energy needs. With advancements in technology, installing solar panels on a sailboat has become more practical and efficient than ever before. In this blog post, we will explore the benefits of solar power on a sailboat and provide a step-by-step guide on how to install and optimize your solar panel system.
1. Why is Solar Power Useful on a Sailboat?
Sailboats offer an ideal environment for harnessing the power of the sun. Unlike motorboats, sailboats rely on wind power for propulsion, making them more energy-efficient. By installing solar panels on your sailboat, you can generate electricity to power various onboard systems, including lighting, navigation equipment, refrigeration, and electronics. Solar power eliminates the need for noisy generators and reduces your dependence on fossil fuels, providing a quieter and greener boating experience.
2. Installing Solar Panels on a Boat
a) Mounting:
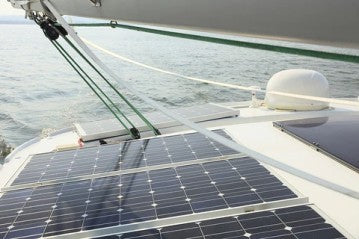
Before you begin the installation process, carefully select the mounting location for your solar panels. Ideally, the panels should be placed on a flat and unobstructed surface on the boat, such as the cabin roof or deck. Ensure that the mounting location allows for easy access and does not interfere with the boat's rigging or sails.
b) Positioning Your Solar Panel:
To maximize solar energy production, it is essential to position your solar panel correctly. Ideally, the panel should be oriented towards the sun to receive optimal sunlight throughout the day. If possible, angle the panel to match the latitude of your location, as this will help maximize energy capture. Additionally, ensure that the panel is not shaded by any obstructions, such as masts, sails, or other equipment, as shading can significantly reduce the panel's efficiency.
c) Wiring Your Solar Panels:
To connect your solar panels to the onboard electrical system, you will need to run wiring from the panels to the battery bank. Use marine-grade solar cables and connectors that are designed to withstand the harsh marine environment. Ensure that the wiring is properly protected and secured to avoid damage from vibration or exposure to saltwater. It is recommended to use conduit or wire ducts to keep the wiring organized and protected.

3. Cabling and Connector Considerations
When choosing the cables and connectors for your solar panel system, consider the following factors:
a) Cable Size: Select the appropriate cable size based on the distance between the panels and the battery bank. Longer cable runs may require larger gauge cables to minimize voltage drop and maximize efficiency.
b) Connector Type: Use high-quality connectors that are specifically designed for marine applications. Ensure that the connectors are waterproof and corrosion-resistant to withstand the marine environment effectively.
c) Fuse or Breaker: Install a fuse or circuit breaker between the solar panels and the charge controller to protect the system from potential short circuits or overloads. This safety measure helps prevent damage to the panels or the onboard electrical system.
4. Choosing the Right Charge Controller
A charge controller is a crucial component of any solar panel system, as it regulates the charge going into the battery bank. When selecting a charge controller for your sailboat, consider the following factors:
a) Type: There are two main types of charge controllers: PWM (Pulse-Width Modulation) and MPPT (Maximum Power Point Tracking). MPPT controllers are more efficient, especially in low light conditions, and can increase energy harvest by up to 30% compared to PWM controllers.
b) Capacity: Ensure that the charge controller can handle the maximum output of your solar panel system. Consider the wattage of your panels and the voltage of your battery bank when choosing a charge controller with the appropriate capacity.
c) Monitoring and Protection: Look for charge controllers that provide comprehensive monitoring and protection features, such as battery voltage display, overcharge protection, and temperature compensation. These features will help optimize the performance and lifespan of your battery bank.
5. Conclusion
Installing solar panels on a sailboat is a sustainable and cost-effective way to power your onboard systems. By utilizing the sun's energy, you can reduce your reliance on fossil fuels and enjoy a quieter and more eco-friendly boating experience. Properly mounting and positioning your solar panels, along with careful consideration of cabling, connectors, and charge controller selection, will ensure a successful installation and optimized energy production. Embrace solar power on your sailboat and embark on a greener boating journey.
Remember to consult with a professional or an experienced marine electrician before proceeding with any installation to ensure compliance with safety regulations and best practices.
0 comments