How to install your home Solar System in right way?

solar-system-installation

Solar System Installation Steps and Precautions


With the development of renewable energy, more and more people are considering installing a home solar system. However, installing a solar system is not a simple task. In this blog, we will introduce the installation steps and precautions of solar systems to help you better understand how to install a solar system.


Step 1: Connect the controller and battery

The controller and battery are the most important parts of the solar system. Before installing the solar panel, the controller and battery must be connected first. The controller monitors the battery level and controls the flow of current to avoid overcharging or over-discharging. When connecting the controller and battery, be sure to follow the correct polarity and voltage specifications.


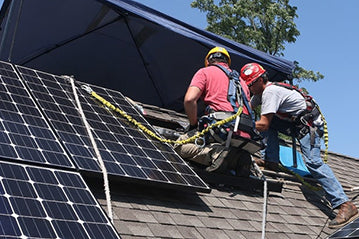
Step 2: Install the solar panel

The solar panel is the part of the solar system that collects solar energy. Installing the solar panel requires selecting a suitable location that can receive maximum sunlight. When installing the panel, ensure that it is mounted on a sturdy bracket and use appropriate installation tools to secure it.


Step 3: Connect the solar panel and controller

After installing the solar panel, it needs to be connected to the controller. During the connection process, it is necessary to follow the correct polarity and voltage specifications. In addition, appropriate cables are required to connect the panel and controller, ensuring that the cable is long enough and its quality can withstand the current load.


Step 4: Connect the controller and inverter

The inverter is the part that converts the direct current produced by the solar system into alternating current. When connecting the controller and inverter, it is necessary to follow the correct polarity and voltage specifications. In addition, appropriate cables are required to connect the controller and inverter, and ensure that the cable's quality can withstand the current load.


Step 5: Connect the inverter and the grid

Connecting the inverter to the grid is a key step to allow the solar system to transmit excess electricity to the grid. When connecting the inverter and the grid, it is necessary to follow local regulations and ensure the safety and reliability of the installation and connection.


Precautions:

When conducting electrical connections, make sure to disconnect all power sources and follow the correct procedures for connection.

Pay attention to lightning and overvoltage protection, and use lightning protection and overvoltage protectors.

Thoroughly check all equipment and parts before installation to ensure they are in good condition and follow all safety guidelines and recommendations.

If you are unsure how to install a solar system, seek professional help to ensure safety and correctness.


We hope these steps and precautions will help you. If you have any questions, please feel free to seek help from professionals.

Leave a comment

Please note, comments need to be approved before they are published.

1. What is a Solar Controller?

A solar controller, also known as a charge controller, is a device that regulates the amount of charge that is sent to the battery from the solar panel. The controller ensures that the battery is not overcharged or undercharged, which can damage the battery and reduce its lifespan.
A solar controller works by monitoring the voltage of the battery and the solar panel. When the battery voltage drops below a certain level, the controller will allow more charge to be sent to the battery. When the battery voltage reaches a certain level, the controller will reduce the amount of charge that is sent to the battery. There are two main types of solar controllers: pulse width modulation (PWM) and maximum power point tracking (MPPT). PWM controllers are the simpler and less expensive option. They work by turning the solar panel on and off to regulate the amount of charge that is sent to the battery. MPPT controllers are more advanced and efficient. They work by constantly adjusting the voltage and current to ensure that the solar panel is operating at its maximum power point.
To build a 2000 watt solar power kit, you would need the following: solar panels and mounting hardware, an inverter, batteries, wiring and control systems, charge controllers and other accessories. You should also consider additional elements such as back-up generators and energy efficient appliances.
A 2000 watt solar panel can run a variety of household appliances, including a refrigerator, washing machine and clothes dryer, a dishwasher, lights, heating and cooling systems, and more. Depending on the size and efficiency of the appliances, it could even power an entire home.
Types of batteries in solar systems, their advantages and disadvantages, and how to choose them. In solar energy systems, batteries are critical equipment for storing solar energy. Common types of batteries used in solar systems include lead-acid batteries, nickel-iron batteries, and lithium-ion batteries. Different types of batteries have their own advantages and disadvantages, as follows: 1.Lead-acid batteries: Lead-acid batteries are the most widely used batteries in solar systems due to their relatively low cost and ease of maintenance and replacement. However, their energy density is relatively low, their lifespan is relatively short, and they require regular maintenance. 2.Nickel-iron batteries: Nickel-iron batteries have a higher energy density, longer lifespan, and are less susceptible to damage from overcharging or overdischarging. However, they are relatively expensive and heavy, and require special installation brackets. 3.Lithium-ion batteries: Lithium-ion batteries have high energy density, long lifespan, and are lightweight, and do not require regular maintenance. However, they are relatively expensive and require special charging and discharging management. When choosing a battery, several factors need to be considered: 1.Capacity: Choose a battery with a suitable capacity according to the amount of solar energy to be stored and the electricity demand of the load. 2.Working temperature: Consider the ambient temperature of the solar system and the applicable temperature range of the battery, and choose a suitable battery. 3.Cycle life: Choose a battery type and brand that is suitable for the required service life. 4.Cost: Choose a battery type and brand that is suitable for your budget. In summary, choosing the right battery for your solar system requires considering multiple factors, including capacity, working temperature, cycle life, and cost. When choosing a battery, make a reasonable choice based on your actual needs and budget.