In recent years, there has been a surge in the popularity of camper van travel, and along with it, the demand for sustainable and self-sufficient power solutions. A solar power system offers the perfect solution, providing camper van owners with the ability to harness clean and renewable energy while on the road. In this comprehensive guide, we will walk you through the process of installing a solar power system on your camper van, ensuring a professional installation that maximizes performance and safety.
I. Planning and System Sizing
Before diving into the installation process, it is crucial to determine your power needs and properly size your solar power system. Begin by assessing the energy requirements of your appliances and devices. Consider the wattage of each item and estimate the daily energy consumption. This assessment will help you choose the right solar panels and battery capacity for your needs.
Next, evaluate the available space on the roof of your camper van. Measure the roof area to identify the suitable space for solar panels. Keep in mind any obstructions, such as vents or air conditioning units, that may affect panel placement. This step will ensure optimal sunlight exposure and maximize energy generation.
When selecting solar panels, prioritize high-quality, efficient panels that can withstand the rigors of the road. Look for reputable manufacturers and consider factors such as efficiency ratings and durability. Keep in mind that while the initial cost may be higher, investing in quality panels will pay off in the long run.
To ensure you have sufficient power storage, calculate the battery capacity required for your solar power system. Batteries store excess energy generated by the solar panels for use during cloudy days or at night. Consider the battery's capacity, voltage, and type (e.g., lithium-ion or lead-acid) based on your energy needs and budget.
II. Installation Process
Now that you have planned and sized your solar power system, it's time to dive into the installation process. Here's a step-by-step guide to help you through the process:
1. Gather the necessary tools and materials: Before starting the installation, compile a list of tools and materials needed. This includes solar panels, a charge controller, batteries, wiring, mounting hardware, and appropriate safety equipment.
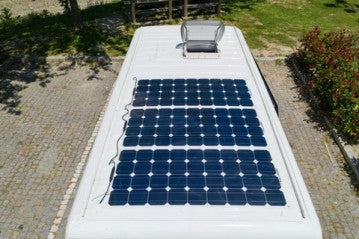
2. Mounting the solar panels: Begin by securely mounting the solar panels on the roof of your camper van. Ensure the roof surface is clean and free from debris, then use suitable mounting hardware to secure the panels. Take into account the structural integrity and aerodynamics of your van to ensure a secure and stable installation.
3. Installing the charge controller and battery: Install the charge controller, which regulates the flow of electricity from the solar panels to the battery. Connect the charge controller to the solar panels and the battery system, following the manufacturer's instructions. Pay careful attention to wiring and connections, ensuring they are properly insulated and protected.
4. Wiring and electrical connections: Route and connect the necessary wires, fuses, and switches to establish the electrical circuitry of your solar power system. It's essential to follow electrical codes and best practices to ensure a safe and efficient installation. Label the wiring for easy identification and future maintenance.
5. Testing and safety considerations: Once the installation is complete, it's time to test the system to ensure proper functionality. Test the solar panels, charge controller, and battery to verify that they are working as intended. Additionally, implement safety precautions such as grounding the system and installing circuit protection devices.
III. Maintenance and Optimization
Congratulations on successfully installing your solar power system! To ensure its long-term performance and reliability, regular maintenance and optimization are essential. Here are a few tips to help you make the most of your solar power system:
1. Regular maintenance routines: Incorporate routine maintenance tasks into your schedule. Clean the solar panels periodically to remove dust, debris, and any shading elements that may affect their efficiency. Check the connections regularly to ensure they are secure and free from corrosion. Additionally, monitor the health of your batteries and replace them when necessary.
2. Energy optimization tips: Optimize your energy usage to get the most out of your solar power system. Invest in energy-efficient appliances and devices to reduce your overall power consumption. Unplug appliances when not in use to eliminate phantom loads that drain power. Consider using LED lights, which consume less energy compared to traditional incandescent bulbs.
3. Expansion and upgrades: As your power needs evolve, you may want to expand or upgrade your solar power system. Adding more solar panels or increasing battery capacity allows for greater energy generation and storage. Before making any changes, consult a professional to ensure compatibility and optimal system performance.
Conclusion
Installing a solar power system on your camper van empowers you to travel sustainably and independently. By following the steps outlined in this comprehensive guide, you can achieve a professional installation that maximizes performance and safety. Remember to plan and size your system appropriately, follow installation best practices, and prioritize regular maintenance to ensure the long-term efficiency of your solar power system. Embrace the freedom and sustainability that solar power brings to your camper van adventures and enjoy the benefits of clean, renewable energy on the open road.
0 comments