Connecting a solar charge controller to a battery is a crucial step in setting up a solar power system. A solar charge controller regulates the flow of electricity from your solar panels to your battery, ensuring safe and efficient charging. In this blog post, we'll guide you through the process of connecting a solar charge controller to a battery.
Tools and Equipment Needed
Before we dive into the steps of connecting a solar charge controller to a battery, let's first make sure we have the necessary tools and equipment. Here's what you'll need:
1. Wire cutters and strippers: To cut and strip the wires to the appropriate length.
2. Crimping tool: To crimp wire connectors onto the ends of the wires.
3. Appropriate wiring: To connect the solar charge controller to the battery. The wiring should be of appropriate gauge and length for the distance between the controller and battery.
4. Appropriate connectors: To connect the wires to the solar charge controller and battery.
Steps to Connect Solar Charge Controller to Battery
Now that we have our tools and equipment ready, let's get started with the steps to connect a solar charge controller to a battery:

1. Choose a mounting location: Your solar charge controller should be installed indoors or in a weatherproof enclosure. Choose a location that is close to your battery and convenient for wiring. The controller should be mounted on a sturdy surface, using screws or other appropriate mounting hardware.
2. Connect the solar panels: Connect your solar panels to the charge controller using appropriate wiring. Be sure to match the polarity of the wires correctly.
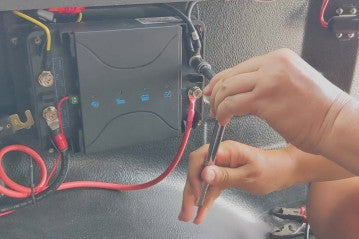
3. Connect the battery: Connect your battery to the charge controller using appropriate wiring. Be sure to match the polarity of the wires correctly.
4. Connect any load: If you have a load (such as a DC appliance) that you want to power directly from the battery, connect it to the charge controller using appropriate wiring.
5. Double-check all connections: Before turning on your solar power system, double-check all connections to ensure they are secure and correctly wired.
6. Program the solar charge controller: Once your solar charge controller is connected to the battery, program it for optimal charging performance. Set the charge controller to the type of battery you are using (e.g. lead-acid, lithium-ion) and the appropriate charging voltage. This will prevent overcharging or undercharging, which can damage your battery.
Tips and Best Practices
When connecting a solar charge controller to a battery, there are a few additional tips and best practices to keep in mind:
1. Use appropriate wire gauge: The size of the wire gauge you use should be appropriate for the distance between the charge controller and the battery. Using wire that is too thin can result in voltage drop and reduced charging efficiency.
2. Match polarity correctly: It's important to match the polarity of the wires correctly when connecting the charge controller to the battery. Reversing the polarity can damage the controller and/or battery.
3. Keep the wiring neat and organized: Neat and organized wiring makes it easier to troubleshoot and maintain your solar power system.
Conclusion
Connecting a solar charge controller to a battery is a relatively simple process, but it's important to do it correctly to ensure safe and efficient charging. By following the steps and tips outlined in this blog post, you can connect your solar charge controller to your battery with confidence. Remember to always double-check your connections and refer to the manufacturer's instructions for specific guidance. With the right setup, you can enjoy the benefits of renewable solar energy for years to come.
0 comments