Da die Nachfrage nach erneuerbaren Energielösungen weiter steigt, erfreuen sich netzunabhängige Solarsysteme bei Hausbesitzern und umweltbewussten Personen zunehmender Beliebtheit. Netunabhängige Solarsysteme nutzen die Kraft der Sonne zur Stromerzeugung und bieten eine zuverlässige und nachhaltige Alternative zu herkömmlichen Energiequellen. Wenn Sie erwägen, Solarenergie zu nutzen und netzunabhängig zu werden, führt Sie dieser umfassende Leitfaden durch den Prozess der Planung und Installation Ihres DIY-Netzunabhängigen Solarsystems.
I. Verständnis von netzunabhängigen Solarsystemen: Ein Überblick
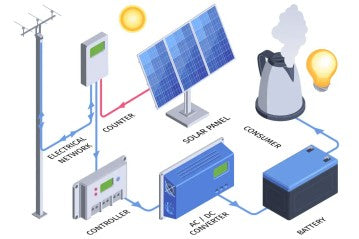
Bevor Sie sich mit den Details des Aufbaus Ihres eigenen netzunabhängigen Solarsystems befassen, ist es wichtig, die grundlegenden Komponenten und ihre Funktionen zu verstehen. DIY-Netunabhängige Solarsysteme bestehen aus drei Schlüsselelementen:
1. Solarmodule: Diese Photovoltaik (PV)-Module wandeln Sonnenlicht in Gleichstrom (DC) um. Die Anzahl der benötigten Solarmodule hängt von Ihrem Energiebedarf und der Sonneneinstrahlung an Ihrem Standort ab.
2. Laderegler: Der Laderegler regelt den Stromfluss von den Solarmodulen zu den Batterien. Er verhindert Überladung und gewährleistet eine optimale Batterieleistung und Langlebigkeit.
3. Batterien: Die von Solarmodulen erzeugte Energie wird in Tiefzyklusbatterien gespeichert. Diese Batterien liefern eine konstante Stromversorgung während Perioden geringer Sonneneinstrahlung oder nachts.
II. Planung Ihres netzunabhängigen Solarsystems: Schritte zum Erfolg

1. Ermitteln Sie Ihren Energiebedarf: Beginnen Sie mit der Berechnung Ihres durchschnittlichen täglichen Energieverbrauchs. Berücksichtigen Sie Geräte, Beleuchtung und andere elektrische Geräte, die Sie regelmäßig verwenden. Diese Einschätzung hilft Ihnen, die Größe Ihrer Solaranlage und Ihres Batteriespeichers zu bestimmen.
2. Bestimmen Sie die Solarmodulkapazität: Um die Anzahl der benötigten Solarmodule zu bestimmen, berücksichtigen Sie Faktoren wie Ihren Standort, die verfügbare Dachfläche und die Leistung der Solarmodule. Wenn Sie beispielsweise 6.000 Wattstunden Strom pro Tag benötigen und 250-Watt-Module haben, benötigen Sie 24 Module (6.000 ÷ 250 = 24).
3. Wählen Sie den richtigen Batteriespeicher: Die Wahl des richtigen Batteriespeichers ist entscheidend für die Speicherung überschüssiger Energie. Berücksichtigen Sie Faktoren wie Batteriekapazität, Spannung und Entladetiefe. Blei-Säure- und Lithium-Ionen-Batterien werden häufig in netzunabhängigen Solarsystemen verwendet, wobei Lithium-Ionen-Batterien eine höhere Effizienz und längere Lebensdauer bieten.
4. Wählen Sie einen Laderegler: Der Laderegler sollte zur Spannung Ihres Batteriespeichers und zur Stromabgabe Ihrer Solarmodule passen. PWM (Pulsweitenmodulation) und MPPT (Maximum Power Point Tracking) Laderegler werden häufig verwendet. MPPT-Regler sind effizienter und können bis zu 30 % mehr Leistung liefern.
5. Wählen Sie einen Wechselrichter: Ein Wechselrichter ist eine entscheidende Komponente Ihres netzunabhängigen Solarsystems, da er den in den Batterien gespeicherten Gleichstrom in Wechselstrom umwandelt, der zum Betreiben Ihrer Geräte verwendet werden kann. Es gibt zwei Haupttypen von Wechselrichtern, die Sie berücksichtigen sollten:
a. Reine Sinus-Wechselrichter: Reine Sinus-Wechselrichter erzeugen eine glatte und saubere Welle, die dem vom Netz gelieferten Strom sehr ähnlich ist. Sie sind ideal für die Stromversorgung empfindlicher Elektronik wie Laptops, Fernseher und Kühlschränke. Reine Sinus-Wechselrichter gewährleisten die Kompatibilität mit einer Vielzahl von Geräten und reduzieren das Risiko von Schäden oder Leistungsproblemen.
b. Modifizierte Sinus-Wechselrichter: Modifizierte Sinus-Wechselrichter sind günstiger, erzeugen aber eine gestufte Wellenform, die möglicherweise nicht so glatt ist wie der Netzstrom. Obwohl sie die meisten grundlegenden Geräte und Elektrowerkzeuge handhaben können, funktionieren einige Geräte möglicherweise nicht optimal oder erzeugen ein summendes Geräusch. Es ist wichtig, die Kompatibilität Ihrer Geräte mit einem modifizierten Sinus-Wechselrichter zu überprüfen, bevor Sie eine Wahl treffen.
III. Installation Ihres netzunabhängigen Solarsystems: Alles zusammenfügen
1. Montage der Solarmodule: Stellen Sie sicher, dass Ihre Solarmodule so positioniert sind, dass sie maximale Sonneneinstrahlung erhalten. Sie können zwischen dachmontierten oder bodenmontierten Systemen wählen. Dachmontage ist üblich für Wohninstallationen, während Bodenmontage Flexibilität und einfachere Wartung bietet.
2. Verkabelung und Anschlüsse: Eine ordnungsgemäße Verkabelung ist entscheidend für ein sicheres und effizientes netzunabhängiges Solarsystem. Befolgen Sie die Anweisungen des Herstellers und die örtlichen elektrischen Vorschriften beim Anschließen von Solarmodulen, Ladereglern und Batterien. Verwenden Sie entsprechend dimensionierte Kabel und Sicherungen, um Überhitzung und elektrische Gefahren zu vermeiden.
3. Installation des Batteriespeichers: Installieren Sie den Batteriespeicher in einem kühlen, gut belüfteten Bereich. Schließen Sie die Batterien je nach Spannungsanforderungen Ihres Systems in Reihe oder parallel an. Sorgen Sie für ausreichende Belüftung und sichern Sie die Batterien, um Unfälle zu vermeiden.
4. Anschließen des Ladereglers: Schließen Sie den Laderegler gemäß den Anweisungen des Herstellers an die Solarmodule und den Batteriespeicher an. Überprüfen Sie die Verkabelung, um die richtige Polarität sicherzustellen, und ziehen Sie alle Anschlüsse fest an.
5. Anschließen des Wechselrichters: Schließen Sie den Wechselrichter gemäß den Anweisungen des Herstellers an den Batteriespeicher an. Stellen Sie sicher, dass der Wechselrichter ordnungsgemäß geerdet ist und die Anschlüsse sicher sind. Überprüfen Sie die Polarität und Verkabelung, um elektrische Pannen zu vermeiden.
Fazit
Indem Sie die Komponenten verstehen, Ihr eigenes netzunabhängiges Solarsystem planen und installieren, können Sie einen wichtigen Schritt in Richtung Energieunabhängigkeit unternehmen und Ihren CO2-Fußabdruck reduzieren. Denken Sie daran, gründliche Recherchen durchzuführen, Sicherheitsrichtlinien einzuhalten und bei Bedarf Fachleute zu konsultieren. DIY-Netunabhängige Solarsysteme bieten eine lohnende Erfahrung, die es Ihnen ermöglicht, saubere, erneuerbare Energie zu erzeugen und den Weg für eine nachhaltige Zukunft zu ebnen.
Nutzen Sie die Kraft der Sonne und erschließen Sie das Potenzial netzunabhängiger Solarsysteme, um Ihren Energiebedarf effizient und nachhaltig zu decken.
0 comments